I love a good unique idea which is why I LOVE these adorable 3D valentine cards!
My kids asked for these cards every year from preschool up until 2nd grade (then they got too cool for them!) But every year they were a huge hit and people have always wanted to know how I made them. So here is a step by step of how I do these cards along with amazon links at the bottom to find all my tools and treats.
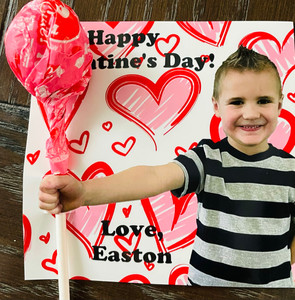
First, you need to take a picture of your child holding out a fist at about a 45 degree angle from their body. If you are doing a different treat, like my light saber card, have them turn to the side and pretend to hold a bat, but also further out from their body.


Next you can use an editing software, I used Canva, to remove the background of the picture and replace it with any sort of design you like. Set your size to 4x4 inches if you can - if not, you can change the size when you print!
You will want to place them to the right of the frame. I found the best sizing is from the hips up, with a little space left above the head (see above for reference)
In Canva this is where I find my backgrounds and add them to my photo (I do have a premium account, but there are a lot of fun backgrounds and text available on the free account).
After you add the background, add the text! Ideally you will want to keep the text closer to their body, so it doesn't get covered up when you put the treat in it.
This step is completely optional, you can take a photo on a blank wall or any background you desire. And then save that edited photo to the computer.
Finally, you are going to want to use Walgreens for your photo printing, this is the only place I have found that prints 4x4 inch photos, can print the same day, and they usually have some pretty good discounts.
Double check to make sure the framing is correct (i.e. they are to the right, hand isn't cut off, body size is correct, etc.), then print out the number you need - I always print some for me and save in a memory box.
Next you need to get either lollipops, glowsticks, etc. to put in the valentine. I used red glow sticks for light sabers, my son was on French fry kick one year so I found yellow glow sticks for that, as far as lollipops mine love tootsie pops but any will work! Other fun ideas are pencils, pixie sticks, or crazy straws!
You will use an x-acto knife to make a small slit above the top and bottom of the fist, slide the treat in there and you’re done! I always put a little tape on the back to make sure it stays in place and doesn’t slide out when they are handing them out.


This valentine has always gotten rave reviews, and the kids think it is so much fun. Is it a little extra? Absolutely! But one of my favorite Valentine memories!
Here is my amazon list of items you might need to make these 3D Valentines
#ad (This is an affiliate link, and I do earn commission on sales)

Comments